Saturday, January 28, 2012

Chilling Sugar Cookie Dough

To chill or not to chill sugar cookie dough. That is the question.


Some people do. Some don't. I tried chilling a few times but it didn't seem to help with cutting the shapes, transferring the shapes to a cookie sheet, or having the shapes bake with less spreading.

I was experimenting with chilling the other day and realized that it was WHEN I was chilling that didn't help. But there is a time to chill the dough that DOES help. Woo hoo!

When I chilled the dough before, I just divided it in two, wrapped those lumps in plastic wrap and put them in the refrigerator for an hour or so.

The only noticeable difference was that the dough was hard to roll out. By the time I was done with rolling and cutting, it was limp. Sometimes I'd skew my shapes a bit as I lifted them up and transferred them to the baking sheet, just as I sometimes do without chilling. My first thought, was forget it. Why bother chilling?

Then it came to me. Make the dough. Roll it out immediately. Chill. Then cut. Shazam! I could hold one of those shapes dangling in the air between two fingers and it wouldn't lose its shape. Well, almost. Close enough for me!

So exciting, huh?

But it gets better. I also wanted to do my rolling without flour. Before, I was rolling on floured waxed paper or a floured fondant sheet. Too messy. Too much risk of tough cookies. Too much of a pain to knead the scraps back together when they've been floured.

Sooooo . . .My new fabulous method of rolling, chilling, cutting . . .

Place the dough on top of a piece of plastic wrap. Lay another piece of plastic wrap on top. Pat the dough down a bit to get started.

Roll. Lift up the top piece of plastic wrap every now and again and lay it back down. It gets a tight hold on the dough and needs to let go a bit.

No sticking!

Slide the dough onto the back of a cookie sheet. I've been doing this so I don't distort the dough by lifting it. I don't really think it's necessary though. You could lift the dough (along with both pieces of plastic wrap) and put it on the right side of a cookie sheet. That way you could stack them easier in the refrigerator if you're working with a lot of dough.

Refrigerate for about 30 minutes or freeze for 15.

Cut your shapes and be amazed at how they peel off the plastic wrap. Ah. The little things in life.

Bake those puppies.

Gather the scraps on the plastic wrap. Cover with the other sheet. Smoosh them together. Flatten with your fingers. Roll. Back in the fridge.

Now you can get the other one out of the refrigerator and get to cutting it.

I'm thrilled to bits with every step of this new method. The cut shapes are perfect and no flour! Perfection for me!

Edit: They may have cut perfectly but I was having spreading issues. Read about my "scientific" experiment here on how to prevent spreading. Chilling the dough is just part of it.

And an update here.

Valentine Envelope and Love Note Decorated Sugar Cookies

I had a vision. Yes, I did. It was of an open envelope with a heart or love note spilling out. It was a sugar cookie covered in perfect royal icing. They were gorgeous . . . in my mind.


In reality, not so much. Not tooo bad but not as nice as I would have liked.

If you'd like to try your hand at these cookies, here's a little tutorial on how to do it.

You'll need . . .
  • black royal icing, piping consistency, #2 tip for outlining, #1.5 tip for writing (if you're not like me and actually remember to switch tips)
  • white flood royal icing, 10 - 12 seconds, #2 tip
  • red flood royal icing, 10 - 12 seconds, #3 tip
  • square cookie cutters - 2 1/2" for the envelopes, 2" for the note paper
  • heart cookie cutter - 1 3/4" or larger


Roll and chill the dough as I do here.


For the sealed envelopes, use the 2 1/2" square cutter, then cut across, a little more than halfway up to make rectangles. (or if you're not like me and have rectangle cutter, use that.)


Using a knife, score lines to help later with piping.


For the envelopes with the hearts, cut squares with the 2 1/2 " cutter. Score across with a knife at the height of the envelopes. Using a knife, cut the flaps of the envelopes as if they were open.

With the heart cutter, cut hearts. Also cut into your open envelope shapes with the heart cutter. Insert the hearts into the blank areas you just created. (A larger heart would really have been better here. I was thinking that the bottom tip of the heart was going to be hidden "inside" the envelope because it was below that horizontal line. Doh. That's just the fold of the flap.)

Score the lines with a knife as before. (Not shown here.)


For the envelopes with the love notes, cut squares with the 2 1/2 " square cutter. Score and cut as before.

With the 2" square cutter, cut out squares. Also cut into your open envelope shapes with it, at a diagonal. Insert the note into the blank areas you just created. (It may be hard to see here how I inserted the paper because of my scoring on the envelope and across the note paper.)

No need to score across, horizontally, through the note paper, as I did. (Yes, I was confused. I actually had to get an envelope out and look at it! A little too late though for the hearts to be correct.)


Time to pipe.

For the hearts, I found it easiest to start at the bottom of each. It gives you more time to get going before the curve. (OK, it gives ME more time to get going.)

I piped the heart or note papers first, then outlined the envelopes, then the flaps.

See the fold lines? I'm still not sure if I should have outlined those. I can't decide if it would have looked better or worse without them.

I so wish those hearts were tucked down in the envelopes the way the papers are!


Pipe these babies too. Hearts first, then outline, then the flaps.

I used an edible marker to draw the hearts before piping. I very rightly so didn't trust myself to free-hand pipe those little guys.

All you've got left to do now is flood. By the time I piped everything, it was dry enough to get going.


I let the note paper dry for a little while before piping the words. Boy do I need practice writing. It would have helped if I had switched to a #1.5 tip as I had planned.


I made some plain hearts too. Just piped with black and flooded with red. Love the contrast! And they came out super smooth. Yay!


So what would I have done differently?

Definitely something with the heart coming out of the envelope. That's my biggest annoyance with this batch. I wish I had either used a larger heart cutter or just moved the small heart down lower.

I'm not all that pleased with my black piping on the envelopes. They looked fine until I flooded. Maybe if they were grey or white. Maybe no piping at all? Maybe using 20-second icing and flooding sections of the envelopes one at a time, the ones that don't touch first. You know?

A smaller tip for writing the love notes. Sheesh. I just wasn't thinking. If my handwriting was better, the #2 tip wouldn't have been so bad.

Overall, I'm semi-pleased with this bunch. I do love the concept. I do love the black/red contrast. I'm happy with my flooding. It's pretty smooth (except in the smaller areas). The piping and flooding of the plain hearts is good. Coming up with a way to make the envelopes with the hearts and notepaper coming out was very fun.


Happy Valentine's Day!

Tuesday, January 24, 2012

Soaring Winged Heart Valentine Chocolate Sugar Cookies

I made some winged heart chocolate cookies with royal icing.

I used Sugarbelle's Soaring Hearts tutorial. Of course I'm making cookies for fun, but with each batch I want to learn something. I wanted to try these for a few reasons. One is that Sugarbelle created the winged heart using two heart cookie cutters. She cut one heart cookie in half and used those for the wings. I really wanted to try that technique. It was easy and I think they came out quite well.

The other reason is that I wanted to try outlining all of the details in one color, then flooding in other colors. I've seen a lot of cookies outlined in black. I love that look and of course that would save time in that you don't have to make piping icing in each color.


I decided on a grey/pink color scheme.

After the winged hearts, I made some plain hearts with little heart and dot accents.

So with this batch I learned that I like outlining all in one color. It's very unforgiving though. Mistakes in the piping show up much more than they would if they were piped in the same flood colors.

I flooded all of these cookies with a 12ish-second icing. Boy does that flow easier than 20-second! It doesn't take as much coaxing and comes out super smooth.

I also learned a whole lot about chilling and freezing dough. I'm going to do a little more experimenting with that and write up a post about it later.

What would I do diffently? I wish I had used a true black for the outlines. The contrast wasn't as striking with the grey piping as I think it would be with black.

I'm happy to report that there are no "Keeping it Real" photos today. No major blunders this time. Yay!

Monday, January 23, 2012

Swirled Roses - Royal Icing - Again

I attempted making a few more swirled roses with royal icing. So pretty!

I used a super stiff royal icing. That worked better than my previous attempt.

The larger ones are 1 1/2 inches across. The smaller ones are about 1/2 inch.

They were so pretty that I thought I'd attempt adding them straight to some cookies . . .

FAIL! Ha! Ha! Horrible, huh?
Please ignore the grey outlines. I had other plans for these cookies before I decided to try piping flowers onto them.

These are 2 inch rounds.

The one on the left was totally off center. The one on the top right became an oval. I was closer with the bottom one, but look at the petals. They're tight on one side and loose on the other. I think that it would take some practice to be able to pipe them directly onto cookies.

But I wonder if that's too much royal icing for cookies. I haven't tasted one yet. I'll find out soon.

Have you ever used that much royal icing on a cookie?

Edit: It's been 24 hours since making the cookies with the roses. I just had a taste and think I broke a tooth. Just kidding but yeah, pretty difficult to bite through the thick rose!

So the big royal icing roses on cookies is a no-go. That's disappointing. I wonder if using a royal icing with corn syrup would make it hard enough to stack yet still soft enough to enjoy. Maybe I'll try that sometime.

Saturday, January 21, 2012

Swirled Roses - Royal Icing

Swirled Roses in royal icing. I'm making sugar cookies for a bridal shower in a few weeks. I have a wedding cake cutter that I'll be using. I wasn't sure how to decorate the cake cookies so played around with making roses.
I made a few hundred of them! They're only 1/2 inch across or smaller.

I'll keep them in an air tight container until it's time to make the cookies.

I think that I'll do three rows of flowers, one at the top of each tier, then add leaves directly onto the cookies.

The one thing I'm not sure about is whether to add the flowers to the wet cookies or to wait until the base is dry and apply them with a dot of icing. It seems to me that adding the flowers to the wet icing will save time. I'm wondering if it will look as nice though.

I'll test that method first when I get to decorating the cookies.
I'm quite happy with them. I think they'll make the cookies like very pretty.

Thursday, January 19, 2012

Bandage / Band Aid Decorated Sugar Cookies

A co-worker of mine had minor foot surgery. I had the hardest time trying to decide on a cookie design for her. I had a bandaged foot idea. Then I thought it was stupid and decided to make snowmen. Then at the last minute I went back to the bandage idea. I wish I had stuck with snowmen!

Those aren't sooooo bad. I think they're the best of the bunch. It gets worse. . .

Those feet are hilarious and not in the funny, ha ha way I had hoped. They're hilarious in that they are so completely lame. I almost didn't include the foot cookies in my package but I didn't have enough of the band aids, so in they went. They'll be good for a laugh of some sort anyway.

Would you like to know how to make the band aid cookies?

You'll need . . .
2.5" square cookie cutter, cut squares into thirds (rectangles)
2" square cookie cutter, cut corners off with 2.25" circle cutter
1.5" round cookie cutter
blue and green royal icing - 20-second, #2 tip

(20-seconds is the time it takes to come back together after being "cut" with a butter knife.)

Here's what I did. . .


For the rectangular band aids - cut dough with a 2.5" square cutter. With the cutter, cut each square into thirds, creating rectangles.

For the squares - cut dough with a 2" square cutter. Cut the corners off with a 2.25" round cutter.

For the round ones - cut circles with a 1.5" round cutter.


Flood the cookies with a #2 tip and 20-second icing. Allow to dry for a little while.


(I can't imagine anyone will be making foot cookies with band aids on them, but on the off-chance. . . You can see how they came about the same way.)


Flood the center of each band aid. Allow to dry for a little while.


With a #1.5 tip and the same icing, add rows of dots.

So, what would I have done differently? Just about everything. Well, I would have preferred a totally different design. But if I went with the whole bandage thing?

I would have only done band aid shapes. And just the rectangular ones. I'm not a fan of the squares and circles.

I'm happy with the flooding technique I used and the way the design came out.

I'm also glad that I did them in blue and green. I thought about doing them in tan but decided that they needed some color.

I would not do the feet again.

It's time for the most embarrassing part of this post . . .

Keepin' it Real . . .


I showed you what worked, what I wasn't thrilled with, now it's time to show you what REALLY didn't work . . .


I'll wait until you've stopped laughing.

I showed them to my son and asked him what they are.
He said, "Feet with sandals".
"Sandals?" I asked.
"Yeah, roman sandals."

In case you were thinking the same thing (or worse), those are feet wrapped in gauze. Horrendous, huh? No, these weren't included in the cookie package.

You know what I thought about making? Rolls of gauze. I'm soooo glad that I didn't attempt it. The only reason that I didn't was because I thought they'd end up looking like rolls of toilet paper. Smart thinking, eh? At least I made the correct decision on that one.

. . . . . .

This whole set is definitely my least favorite of the cookies that I've made so far.

But I'm already thinking ahead to my next batch. I'm going to a bridal shower in a few weeks. The mother of the bride gave me a wedding cake cutter to use for the cookies. I want to decorate them with flowers. My mind is swimming with different flower possibilities. You'll be seeing what I come up with soon.

Saturday, January 14, 2012

Frog and Daisy Sugar Cookies

Frog and daisy sugar cookies decorated with royal icing for sweet Megan's 16th birthday! She loves frogs so that was an easy choice. I added the daisies because they're pretty just like her. :)

Want to know how to do it? You'll need. . .

Green flood icing - 20-second, #2 tip
Green piping icing, #1.5 tip
White flood icing - 20-second, #2 and #1.5 tip
Black piping icing, #1.5 tip
Red or Pink piping icing, #1.5 tip
Yellow flood icing - 20-second, #2 tip

(20-seconds is the time it takes to come back together after being "cut" with a butter knife.)

Here's what I did. . .


For the square ones, before baking, make a light impression with the frog cookie cutter to help with the decorating later.


Flood the heads with green. Allow to dry for a little while.


Flood the bodies. Allow to dry for a little while.


Add the eyes. I did them a few different ways.


For these, make half circles with white flood icing. Immediately make half circles above the whites with green for the eye lids.


Here we have a winking frog. Ha! One eye is just green flood icing. The other is done the same way as above.


The froggie on the right has eyes simply made with white flood icing circles.


Time to add the legs. Once the legs were added, they started to really look like frogs!


After the whites of the eyes have dried for a while, use black piping icing to draw smaller circles (half circles actually if you can manage it).


Use a toothpick to add a small white highlight to each eye.


Using piping icing, add a green mouth, pink tongue and dots on the legs.

For the square cookie, flood the background with white.


On to the daisies. . .


Before baking(or immediately after if you're the forgetful type like me), make a light impression for the flower center with a small circle cutter (or a soda top if you're like me and don't have one small enough). Flood with yellow. Allow to dry for a while.


Flood the petals with white. Try not to think about sunny-side-up eggs. Allow to dry.


Use piping icing to outline the petals and to make dots around the centers of the flowers.


For the leaves, simply flood, allow to dry, pipe the details.


So pretty!


So what would I do differently next time? I'm thrilled to say "not much". Yay! I'm super pleased with the way these cookies turned out.

I do wish that I had used pink for the tongues. I think that the red just stands out too much.

I also wish that I had made some of the leaves mirror images of the others, instead of having the curve of the vein the same on all of them.

Pretty minor changes, huh? Woo hoo!

Before I go patting myself on the back too much. . .

I'm about to add something that may become an often recurring segment to my posts. I'll call it. . .

Keepin' it Real


I showed you what worked, so I should show you what didn't. . .


Since I had bumped the leg and the toe on two cookies, I used those to test out adding front legs. Oy. What are those? Flappers? Fins? Is he stuck somewhere between a tadpole and a frog?

Miss Frog on the right is included here because she's overdone it a bit with the false eyelashes. I really wanted to add a feminine touch to these frogs with eyelashes. I guess it just wasn't meant to be.

Those cookies aren't going to Megan. They're on the "you may eat these" tray for my guys to enjoy. Luckily the mistake cookies taste just as good as the others.

Well, these cookies were super fun to decorate and I can't believe how I pleased I am with them. If you make frogs like these, I would love to see them! Please leave me a link in the comments.

Thanks for visiting!

Monday, January 9, 2012

Royal Icing Experiment

So as a newly obsessed cookie-decorator-wannabee, I've been struggling with lumpy flood icing. Sometimes it's smooth, but more often it's a mess. It's never as flawless as the cookies I've admired.

Each batch of cookies I've made so far has been an experimentation, trying to learn about royal icing consistencies mostly.

Some decorators outline with a thicker consistency and flood with thinner.

Some people outline and flood with the same medium consistency.

Sometimes they'll outline and flood with a thicker consistency.

They seem to have found what they prefer and go to for certain things. I know that besides getting my icing smooth, I have to find what works for me.

I realized that trying these one at a time will take me forever. I want improvement now. Instant gratification and all that. I don't want batches and batches of stinky cookies until I find my groove.

So it came to me. Whip up some cookies. Random shapes. Whip up some royal icing. No coloring. Just different consistencies of icing. Then play. Test. Write down what's what. So that's just what I did and I learned a whole lot in just one batch of cookies.

I made three consistencies of icing. One straight from the mixer. One was just over twenty-seconds. The last was just over ten-seconds.

For my timing, I "cut" the icing with a butter knife and counted until the icing came back together.

What I'm calling 20-second icing is much thinner than Sweet Sugarbelle's 20-second. She used a small spatula to cut and count. I think that she uses hers to outline and fill small areas. I'll have to remember that.

So here's what I found in my experimenting....

The icing straight out of the mixer was awful. I couldn't control it at all. I doubt that I could have used it anywhere with anything, so that icing was out of the rest of my experimentation. (I read that some decorators do use it that way. Theirs must be much thinner than mine!)

Then I started outlining and flooding. My first cookies looked fine while wet but as they dried, they were lumpy. Yes, lumpy, again. 20-second was lumpy. 10-second was lumpy. Well, that answered my question as to whether or not the consistency was the culprit.

Exhibit A......

So what else could it be? The way I applied the icing? I flooded it, not excessively and used the tip or a toothpick to move it around to spread it out. I've seen decorators use a spatula to smooth the icing and I've seen them use a toothpick.

Maybe not enough icing? BINGO!

Exhibit B......

Smooth as a baby's bottom. With these, I flooded round and round very tightly. I got my tip down in there and moved the icing a bit as I went. When I say that I flooded the cookies, I FLOODED the cookies. But carefully. Maybe a shake here and a quick toothpick there at the end. That was it.

Doh. I guess they used an offset spatula and not a toothpick for a reason!

So besides learning how to flood correctly, I learned a few other things....

For outlining and flooding together, the 20-second icing held its shape much better. The 10-second works but does spread a bit. I prefer the 20-second.

For outlining with a thicker piping consistency first, then I'd prefer 10-second or less for the flooding.

Then I started playing with piping dots, letters, and lines with 10-second and 20-second using #2 tips and #1.5 tips.

The 10-second was bad. Way too loose for any detail work.

The 20-second wasn't good with the #2 tip. It was okay with the #1.5. That's what I used for the flower petals above. They're not bad. I think I'd prefer a thicker consistency for details though.

I now wish that I had made a few piping consistencies for this super-jam packed lesson. But I learned something about that anyway. Before, I was careful, trying to get it just the right thickness where if I scooped it up with my spatula, it would fall off in just a few seconds but would still be flowy. (Does that make any sense?) Now I realize that since the 20-second icing worked okay for outlining and it's a long way off from what I was using before - anything in between will work just fine.

Woo hoo! I feel like I've just taken an abbreviated, royal icing course in just one class.

Saturday, January 7, 2012

Valentines Day Party Favor Sugar Cookies


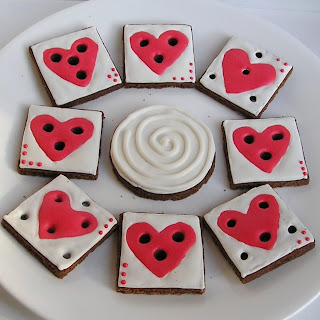
I know what you're thinking. What are those???? They're party favor game cookies! Still baffled?


I was flipping through "Crazy About Cookies" by Krystina Castella and saw her Party Favor Cookies. Remember those party favor games? The ones with the silver balls that you had to get into the holes? She made those from sugar cookies! Brilliant!

My mind immediately began spinning. Imagine the possibilities! Any holiday, any theme, any size. Birthday parties, school parties, bake sales, craft fairs. Kids would love these!

Off to google I went but what were those little favors called? I googled "party favor game silver ball hole". Ha. Or something like that. Eventually I found that they're called "Pill Puzzles". Who knew? Not me.

So what to use to hold these little cuties? At first I thought I'd buy some party favors and take them apart. Bad idea. I'd probably break them and how would I get them back together so that kids could easily get to the cookies after playing the game?

I decided to look around the house for things to use. Peanut butter jar lids? Mayo? Tuna cans? Canning jar lids! Yes! Those might work. I have plenty and could buy more without buying the jars.

Then I decided to see if I could find some kind of box instead. These would be nice if they were smaller. Something like this might work if there was a window in it.

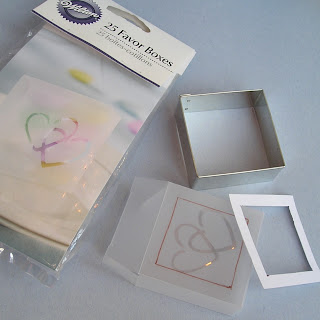
Later at the craft store, I found some Wilton favor boxes in the wedding section. The size was perfect - 2 x 2 x .75 inches. They were frosted though. I decided to try to make it work.
I had a 2x2 square cookie cutter. Perfect. I made a template and cut a window out of the top. Part of a treat bag would work over the window with double-sided tape inside.

I also gathered two canning lids - a wide mouth and a regular. I had a round cutter that fit perfectly into the smaller lid. I wasn't so lucky with the wide mouth lid.

Time to bake cookies! Since Valentines Day is coming up and I wanted to start with a simple design, I went with hearts. I poked holes in the dough before baking. After baking, when they were still soft, I went back and cut them again with the square cutter to make sure they still fit the boxes.

Am I the only one that sees faces in these every time I look at them? Not the best design.

I made a few round cookies for the canning lids. I trimmed up the smaller circle after baking. I hoped that the larger one spread out enough to fit the wide mouth lid.
It didn't.

I got to decorating and assembling. I'm still in love with the idea. The execution of my first attempt has a lot of room for improvement though.


Like the maze? That idea came to me because I forgot to make holes in the dough before baking. That was one of those happy mistakes. Imagine a better, larger maze. Fun!

Improvements for next time....

The box...Unfrosted, with a window, opening on the top instead of the side. There must be one somewhere. Maybe clear, plastic jewelry boxes?

If I use the canning lids, the cookies should be thinner.

Smaller holes or larger sprinkles/dragees.

Pipe around the holes before flooding. See the cookie on the bottom left? I didn't pipe around those holes. The holes were made smaller, which was good, but I think that it contributed in making the flooding around them lumpy.

Thick piping around the outside to keep the "ball" on the playing field. Without it, the game isn't really playable. The balls roll to between the cookie and box and get rather stuck there.

I would love to see some experienced cookie bakers make these! I think that the whole concept is so amazing. Oh, the possibilities!

During my googling, I saw some pill puzzle rings. How about turning 1 inchers into rings?

If you do make any, would you please, please leave a comment with a link so that I can check them out?

If you have any ideas to make these better, I would love it if you shared!

I'm definitely going to try these again!